


Views: 0 Author: Site Editor Publish Time: 2026-08-08 Origin: Site


Patients evaluating cosmetic dentistry share one primary aesthetic concern: avoiding opaque, artificial-looking restorations often referred to as the "chiclet" effect. A truly successful smile transformation relies on replicating the exact optical properties of natural teeth. The most critical zone is the incisal edge. Here, the dense dentin layer thins out, leaving pure enamel that allows light to pass through. Recreating this semi-transparent edge requires precise material selection, conservative clinical preparation, and execution by a master ceramist.
Flat, lifeless teeth occur when light completely bounces off the surface. Natural enamel absorbs, refracts, and transmits light dynamically. To achieve this dynamic light handling, clinicians utilize advanced material sciences and specific clinical frameworks. Designing custom dental veneers that manipulate light exactly like natural enamel involves managing preparation depths, selecting the right luting cements, and layering ceramics with varying opacities. Understanding these technical elements allows you to evaluate providers and materials effectively for a highly aesthetic, biomimetic outcome.
Anatomical Accuracy: Natural incisal translucency relies on replicating the exact light transmission ratio between the dense dentin layer and the translucent enamel edge.
Material Selection is Critical: Not all ceramics perform equally; specific materials like layered glass ceramic veneers offer superior optical depth compared to monolithic pressed blocks.
The Ceramist Partnership: The final aesthetic outcome depends heavily on the dentist’s communication with a master dental laboratory to build custom color gradients and internal characterization.
Biological & Adhesive Integration: True natural aesthetics require healthy, symmetrical gum margins and the correct selection of translucent luting cements to preserve light transmission.
A tooth looks real to the human eye when it interacts naturally with varying lighting conditions. Whether you are standing in natural sunlight, under harsh operatory lights, or in ambient indoor lighting, the restoration must scatter and absorb light correctly. Success in cosmetic dentistry is defined by this dynamic optical behavior rather than just achieving a bright white shade. When a patient walks outside, the natural UV light should interact with the restoration exactly as it does with the adjacent natural teeth, displaying fluorescence and opalescence.
The structural anatomy of a natural tooth dictates its appearance. The inner core consists of dentin, which is highly opaque and carries the primary color or chroma of the tooth. Surrounding this core is the enamel shell. Enamel is crystalline, highly mineralized, and semi-transparent. Light penetrates the enamel and reflects off the underlying dentin. This dual-layer system is what gives a tooth its vitality and depth.
At the biting edge of the tooth, the dentin core tapers off. This leaves an area composed entirely of enamel. When light passes through this pure enamel, it refracts off the incisal tip. This creates the "incisal halo effect." You will notice a subtle, warm, and slightly grayish or bluish outline at the very edge of youthful teeth. Replicating this exact enamel-dentin transition is the foundation of high-end cosmetic restorations. Without this transition, the tooth looks like a solid block of plastic.
Flat, lifeless restorations fail to mimic this anatomical relationship. Clinical causes of these artificial results include the excessive use of opaquers to mask dark underlying teeth. Improper material thickness also plays a role. If a tooth is under-prepared, the ceramist lacks the physical space to layer translucent materials. They are forced to use dense, monochromatic porcelain to fit the restoration within the bite parameters.
A lack of surface texture further contributes to a fake appearance. Natural teeth are not perfectly smooth glass. They have micro-anatomy that scatters light. The baseline requirement for premium porcelain veneers is the ability to support dynamic light reflection, absorption, and transmission simultaneously. When a ceramist fails to build in these optical properties, the resulting veneer will look bright but entirely unnatural, drawing negative attention to the smile.
Modern cosmetic dentistry relies on specific materials to handle light properly. The choice of ceramic dictates the potential for natural translucency. Clinicians must balance the need for structural durability with the demand for flawless aesthetics. The evolution of dental ceramics has provided clinicians with materials that closely mimic the physical and optical properties of human enamel.
Lithium disilicate and leucite-reinforced ceramics represent the gold standard for anterior restorations. These materials possess a refractive index remarkably close to natural human enamel. When light hits glass ceramic veneers, it penetrates the surface before reflecting back, creating an illusion of depth that older materials simply cannot match.
Traditional feldspathic porcelain offers incredible aesthetics but lacks high flexural strength. Lithium disilicate bridges this gap. It provides exceptional durability for high-stress anterior regions while maintaining high optical translucency. Dentists evaluate the patient's bite forces to determine the exact material composition needed. A heavy grinder might require a stronger lithium disilicate core, while a patient with a protected bite might be a candidate for highly translucent feldspathic materials built directly on a refractory die.
How the ceramic is manufactured drastically alters its appearance. Monolithic restorations are milled from a single CAD/CAM block of ceramic. While efficient and strong, they often lack internal depth. They are monochromatic, meaning the color is uniform from the gumline to the incisal edge. Surface stains are applied to mimic gradients, but these stains block light rather than transmit it, leading to a dull appearance over time as the surface glaze wears away.
Hand-layered restorations solve this problem. A master ceramist builds the tooth using different opacities of porcelain powders. They start with a highly opaque dentin layer and progressively build outward with translucent enamel powders. This hand-layering technique is absolutely required to achieve a natural, graduated incisal edge with realistic depth. The ceramist fires the porcelain in a vacuum furnace multiple times, shrinking and condensing the material to achieve the final lifelike result.
Feature | Monolithic Ceramics | Hand-Layered Ceramics |
|---|---|---|
Fabrication Method | Milled from a single CAD/CAM block | Built by hand using various porcelain powders |
Optical Depth | Low to Medium; relies on surface stains | High; internal light transmission mimics nature |
Incisal Translucency | Uniform opacity; lacks the "halo effect" | Highly customizable; true semi-transparent edges |
Flexural Strength | Very High (ideal for posterior teeth) | Medium to High (ideal for anterior aesthetics) |
Wear Resistance | Excellent, but surface stains can wear off | Excellent; color is built internally and cannot wear away |
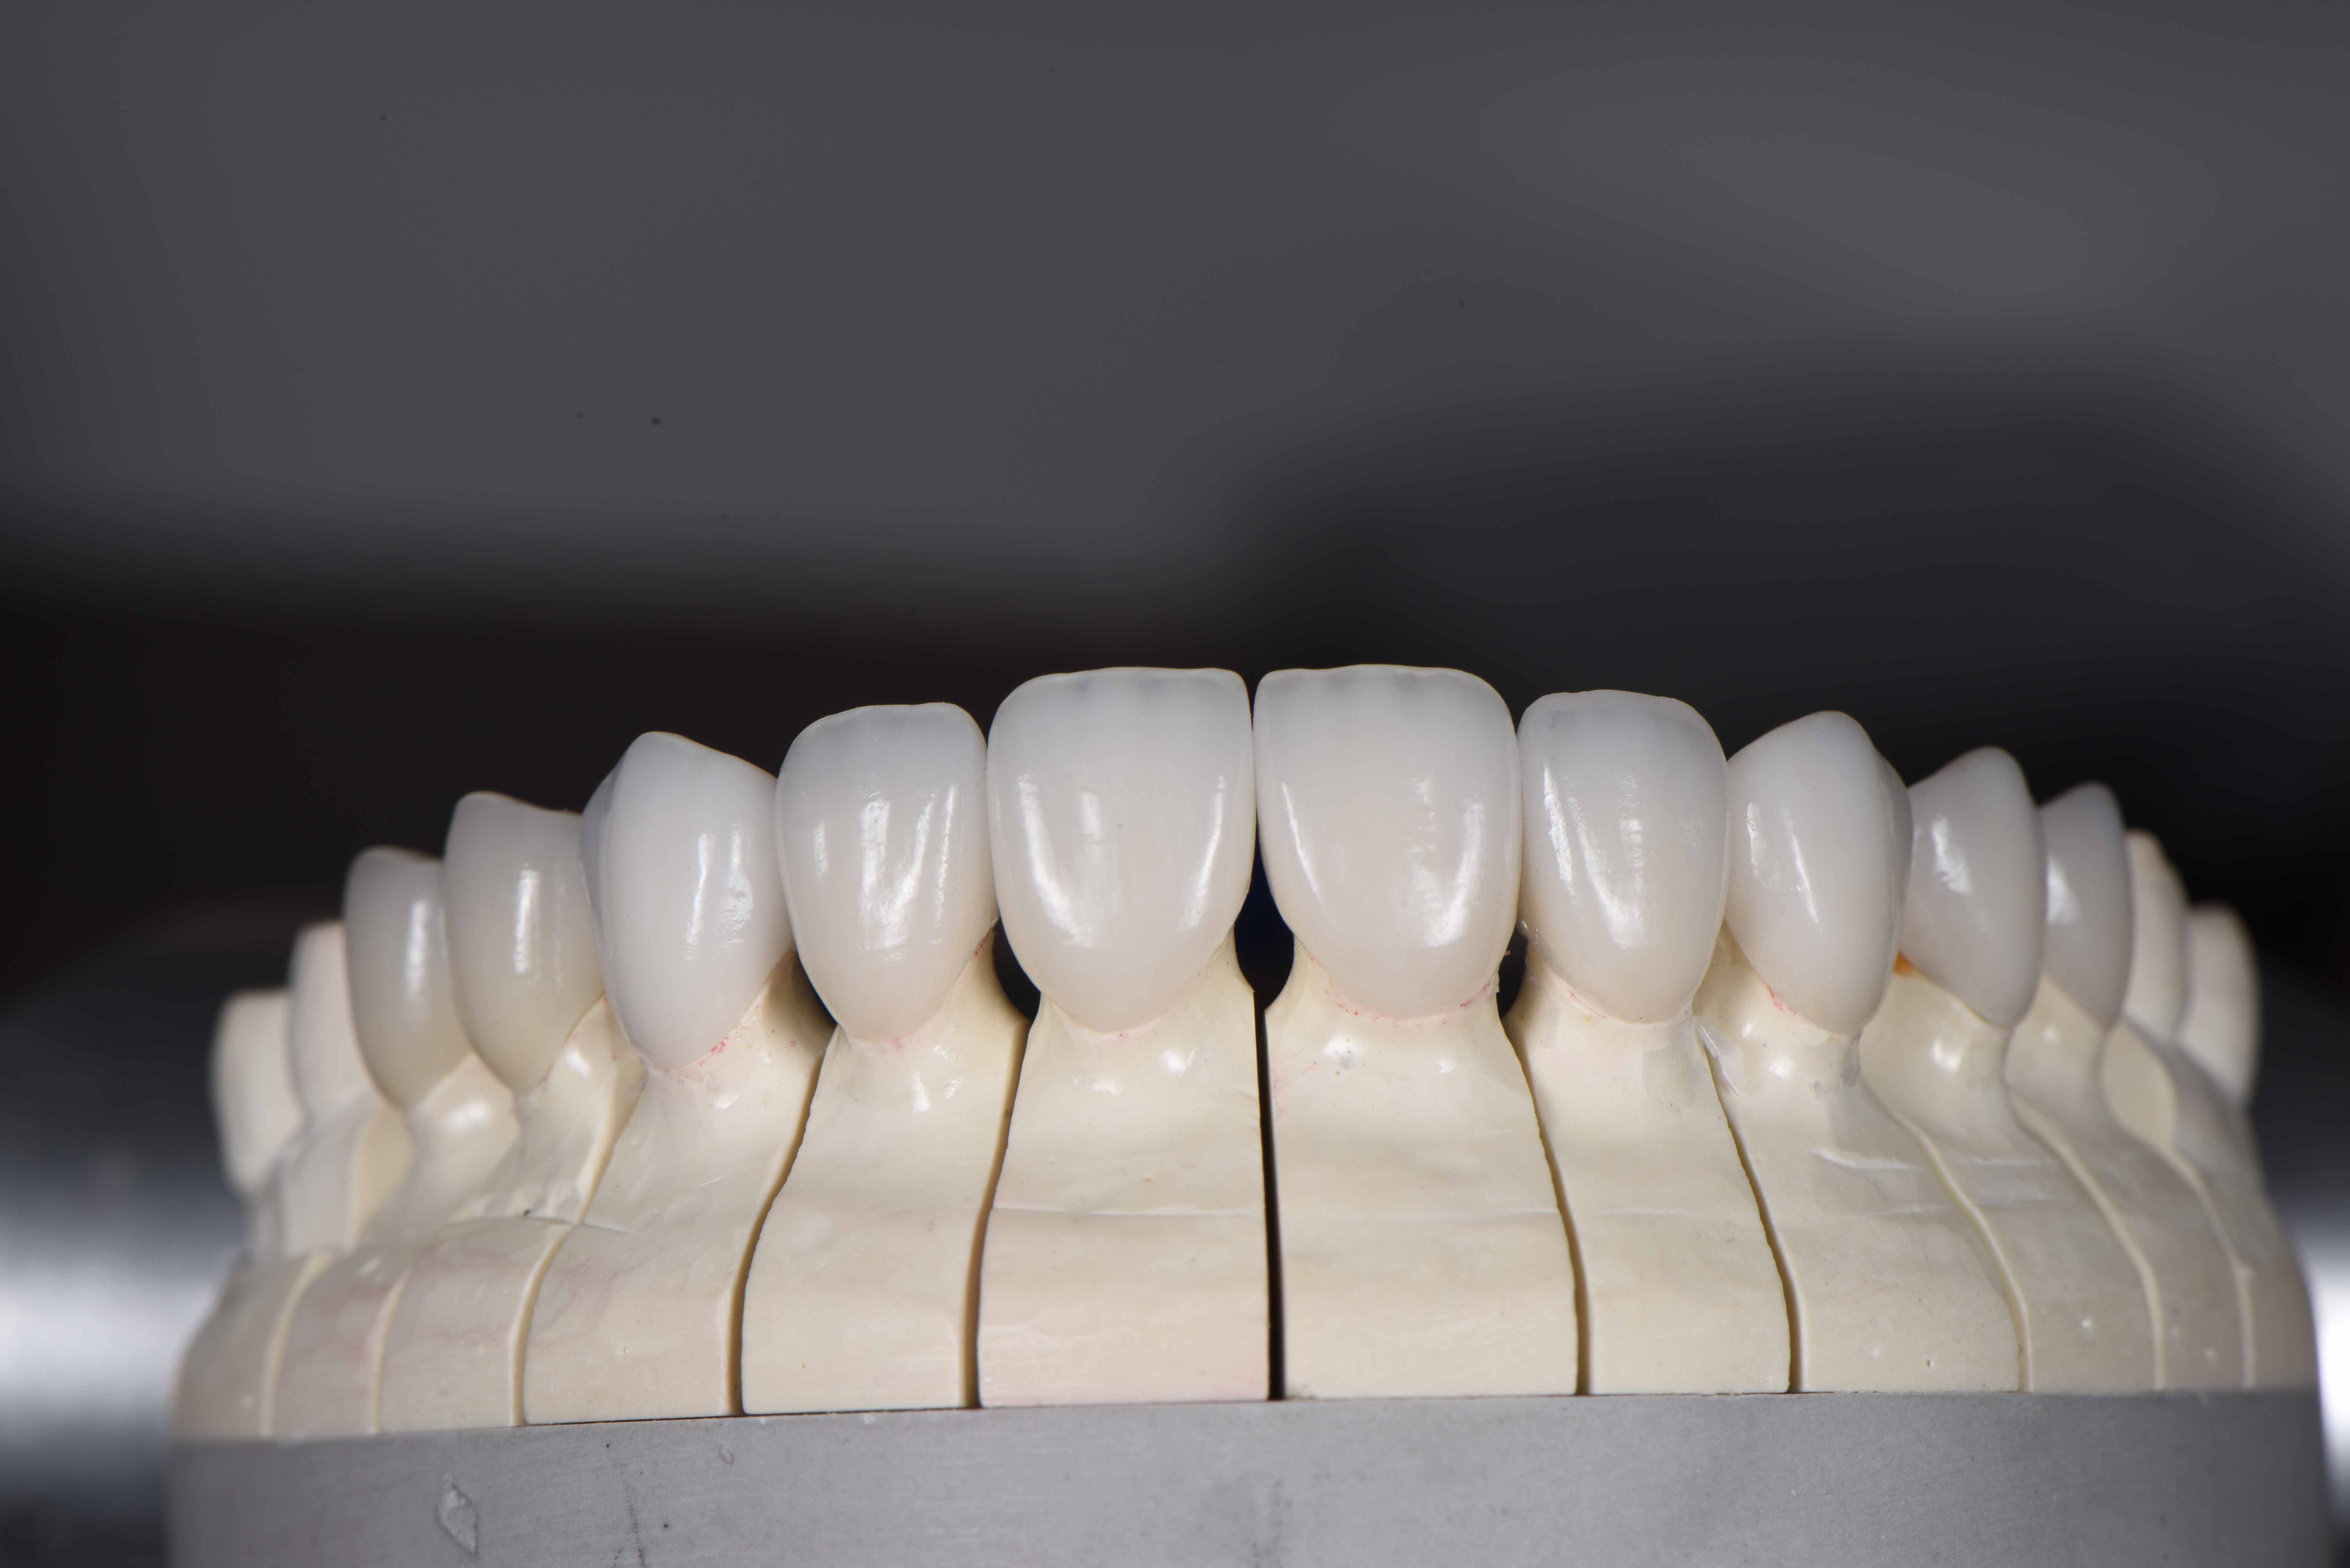
Translating raw ceramic materials into lifelike restorations requires exceptional laboratory techniques. The ceramist acts as an artist, using porcelain to sculpt light and color. You must understand these evaluation dimensions to appreciate the difference between standard and premium outcomes. The laboratory phase is where the true value of a custom restoration is realized.
A natural tooth is never a single solid color. Ceramists map the tooth into distinct chromatic zones. The cervical third near the gumline holds the highest chroma, appearing slightly more yellow or dense. The middle body transitions into a brighter, more neutral shade. Finally, the incisal third drops in value and increases in translucency. This gradient must be seamless to fool the human eye.
To mimic nature, ceramists embed internal effects deep within the porcelain. They recreate mamelons, which are the finger-like dentin structures visible inside youthful teeth. They add developmental lobes, microscopic crack lines, and subtle decalcification spots. These internal characterizations make porcelain laminate veneers indistinguishable from natural teeth. Because these effects are built inside the ceramic, they interact with light authentically and will never brush or polish away.
The external surface of the veneer is just as critical as its internal structure. Natural teeth feature surface morphology, including perikymata (horizontal growth lines) and vertical ridges. This micro-anatomy scatters light, reducing artificial glare and preventing the teeth from looking like flat piano keys. A master ceramist uses specialized burs and diamond pastes to carve these details into the ceramic before the final glaze.
Proper hand-polishing and natural glazing are essential. If a restoration is over-glazed, it takes on a "glassy," artificial shine that reflects too much light. Ceramists carefully polish the surface to achieve a natural luster that resists staining while maintaining the subtle textures that break up light reflection. This mechanical polish ensures the restoration looks wet and vital in the mouth, exactly like healthy human enamel.
The best ceramist in the world cannot overcome poor clinical execution. The dentist must manage strict anatomical and clinical constraints before the restoration is permanently bonded. The preparation phase dictates the final optical success. Every fraction of a millimeter matters when managing light transmission.
Conservative, minimally invasive preparation is paramount. Preserving natural tooth enamel provides the strongest possible bond for the restoration. Enamel is rigid and predictable, whereas dentin is flexible and moist, leading to weaker adhesive bonds. Dentists use depth-cutting burs and magnification loupes to ensure they remove only the exact amount of tooth structure necessary.
Beyond structural adhesion, bonding directly to enamel significantly enhances aesthetics. Natural enamel acts as a fiber-optic network. When translucent porcelain is bonded directly to this natural structure, light passes through the ceramic and continues through the tooth. This seamless light refraction is lost if the tooth is aggressively prepared down to the opaque dentin layer, which stops light dead in its tracks and creates a dull appearance.
Dentists face mathematical realities when masking dark underlying teeth. Tetracycline stains or endodontically treated teeth present severe aesthetic challenges. The clinician must create enough physical space for the ceramist to block the dark color while still leaving room for translucent enamel layers. This often requires slightly deeper preparation, but it must be balanced against the need to preserve enamel.
The color of the prepped tooth is known as the "stump shade." This underlying color heavily influences the final optical properties of thin restorations. If the stump shade is dark, the ceramist must use an opaque masking ingot. This reduces the available space for translucency. Precise preparation depth calculations are required to balance masking ability with incisal light transmission. The dentist must photograph the stump shade with a reference guide so the lab knows exactly what background they are working against.
The bonding agent used to attach the restoration acts as the final optical layer. The shade, opacity, and chemistry of the resin luting cement can drastically alter the aesthetic outcome. A cement that is too opaque will block light transmission, instantly killing the vitality of the restoration. Conversely, a highly translucent cement on a dark tooth will allow the darkness to bleed through the porcelain.
Clinicians utilize "try-in pastes" during the delivery appointment. These water-soluble pastes mimic the exact color of the final cement. They allow the dentist and patient to preview how different cement shades will affect the translucency and value of the final restoration. If the tooth looks too gray, a warmer cement can be selected to raise the value before final light-curing. This step is non-negotiable for achieving perfect optical integration.
Aesthetics do not exist in a vacuum. The surrounding soft tissue frames the teeth. Uneven, inflamed, or asymmetrical gingiva destroys the illusion of natural teeth, regardless of the ceramic's quality. Red, bleeding gums immediately signal that dental work is present and detract from the beauty of the porcelain.
Clinicians must respect the biological width during preparation to ensure tissue health. Adjunctive procedures are often required to frame the translucent incisal edges correctly. Laser gingivectomy or cosmetic crown lengthening can reposition the gum line, creating symmetry and exposing the proper proportions of the clinical crown before impressions are taken. Healthy, stippled, pale pink gums are the required canvas for high-end ceramic work.
Patients must actively vet cosmetic dentists for high-translucency outcomes. Understanding the clinical and laboratory requirements empowers you to ask the right questions during a consultation. You are not just buying a piece of porcelain; you are investing in a highly technical medical and artistic process.
The laboratory used by the dentist is just as important as their clinical skill. High-end cosmetic dentists do not use high-volume commercial labs. They partner with master ceramists who specialize in custom layering techniques. This partnership is built on years of calibrated communication and shared aesthetic philosophies.
Evaluate the dentist's lab communication protocols. Do they perform custom shade matching in the office? Do they use polarization-filtered photography to eliminate glare and capture the true internal chroma of your adjacent teeth? Detailed communication, including provisional matrixing and stump shade photography, is mandatory for biomimetic results. A dentist who simply writes "shade B1" on a lab slip will not deliver a highly characterized, translucent restoration.
Never commit to permanent restorations without a physical preview. A diagnostic wax-up allows the dentist to design the final smile in three dimensions. This design is then transferred to your mouth using a temporary acrylic material, known as an in-vivo mock-up. This process follows a strict clinical workflow:
Initial impressions and digital scans are taken of the existing teeth.
The dentist and ceramist design the ideal tooth proportions on stone models or CAD software.
A silicone matrix is created over the new design.
The matrix is filled with temporary bis-acryl resin and placed over the patient's unprepared teeth.
The matrix is removed, leaving a temporary preview of the final smile directly in the mouth.
This temporary trial smile allows you to evaluate the proposed length, shape, and lip-line integration. While the acrylic will not have the exact translucency of final porcelain, it allows the clinician to verify speech patterns and functional guidance. It serves as the exact blueprint for the master ceramist, ensuring there are no surprises on delivery day.
When reviewing a provider's before-and-after gallery, look past the straightness and whiteness of the teeth. Zoom in on the incisal edges. Look for light passing through the tips of the teeth. Check for natural surface texture and seamless integration with the adjacent natural teeth. The restorations should look like they grew out of the gums, not like they were glued onto the surface.
If every smile in the portfolio looks uniformly opaque, bright white, and flat, that provider likely relies on monolithic materials and heavy opaquers. Seek out portfolios that showcase subtle imperfections, varying translucencies, and healthy, stippled gum tissue. A true master is not afraid to show extreme close-up macro photography of their work.
Highly translucent restorations require specific maintenance and risk mitigation strategies. Understanding these vulnerabilities ensures the longevity of your investment. Proper care will keep the ceramics looking vibrant for decades.
The most translucent part of the restoration is also the most structurally unsupported. Because the incisal edge consists primarily of layered glass ceramic without a dense core backing, it is vulnerable to shear forces. Biting into hard objects like ice, pens, or hard candies can fracture this delicate edge.
Strict occlusal evaluation is necessary. The dentist must establish proper canine guidance, ensuring that your back teeth separate immediately when you slide your jaw side to side. To protect delicate incisal edges from nocturnal bruxism, the use of a custom-fitted hard acrylic night guard is non-negotiable. This appliance absorbs the heavy forces of grinding while you sleep, protecting the porcelain from micro-fractures.
The optical properties of the restoration rely on a pristine adhesive interface. Strict isolation protocols must be maintained during the bonding phase. The use of rubber dam isolation prevents moisture contamination from saliva or crevicular fluid. If moisture touches the tooth during the bonding sequence, the adhesive will fail prematurely.
If the bond is compromised, micro-leakage occurs. Bacteria and stains infiltrate the margin between the tooth and the ceramic. Over time, this margin staining alters the optical properties of the restoration, creating dark lines at the gumline and degrading the overall translucency. Meticulous home care, including daily flossing and professional maintenance with non-abrasive polishing pastes, is required to preserve margin integrity.
Achieving natural incisal translucency requires a meticulous intersection of advanced glass ceramic materials, conservative clinical preparation, and master-level laboratory layering. When evaluating your options, prioritize providers who transparently discuss their laboratory partnerships and aesthetic planning processes. Avoid clinics offering rapid, one-size-fits-all monolithic solutions if your goal is true biomimetic replication.
To move forward effectively, follow these actionable steps:
Request a comprehensive clinical evaluation that includes a review of your bite forces and enamel thickness.
Demand a diagnostic wax-up and an in-mouth provisional mock-up to preview the shape and length before any teeth are prepared.
Ask your clinician specifically about the ceramist they use and request to see cases demonstrating layered incisal translucency.
Commit to wearing a custom night guard to protect the delicate, unsupported edges of your new restorations.
A: Yes. Clinicians achieve this through custom shade matching and polarization photography. A master ceramist uses layered porcelain laminate veneers to build internal characterizations, matching the exact light transmission and chroma gradients of your adjacent natural teeth for a seamless blend.
A: No. High-quality, properly glazed dental porcelain is highly resistant to staining, regardless of its translucency level. The ceramic surface is non-porous. However, the underlying resin cement margin can stain if oral hygiene is poor, which can affect the overall appearance.
A: They can be, as the translucent edge lacks a dense opaque core for support. Dentists mitigate this risk by utilizing high-strength glass ceramic veneers, ensuring proper bite alignment (canine guidance), and prescribing a night guard to protect against grinding forces.
A: Minimal thickness is required to achieve natural depth. Typically, 0.3mm to 0.5mm of space is needed. This allows the ceramist to layer different opacities of porcelain, creating a transition from an opaque dentin core to a translucent enamel edge without looking bulky.
A: This is an optical phenomenon known as "value drop." If a restoration has too much translucency without a proper opaque background, it absorbs the darkness of the oral cavity behind it. Expert ceramist calibration is required to balance translucency with adequate light reflection.


