


Views: 0 Author: Site Editor Publish Time: 2026-08-26 Origin: Site


The fundamental clinical tension in restorative dentistry lies between maximizing tooth conservation and ensuring adequate material thickness to prevent catastrophic fracture. Incorrect preparation depth compromises the structural integrity of posterior restorations. Under-reduction leads to material failure under occlusal load, while over-reduction sacrifices critical enamel needed for predictable bonding and risks pulpal involvement. Bridging the gap between direct composite resins and highly invasive full-coverage crowns, partial ceramic restorations offer a biomimetic solution. To achieve long-term predictability, clinicians must evaluate preparation designs through the lens of specific material properties, milling tolerances, and adhesive protocols. This guide breaks down the exact thickness requirements and design parameters necessary for successful posterior ceramic restorations.
Material-Specific Thresholds: A minimum occlusal reduction of 1.5 mm is the standard baseline for predictable longevity in most ceramic materials, though high-strength zirconia allows for slight deviations under specific conditions.
Adhesion Over Retention: Unlike traditional crowns requiring mechanical retention, a successful ceramic inlay onlay relies on adhesive bonding. This allows for endlessly customizable preparation shapes, making enamel preservation just as critical as material thickness.
Milling Constraints: In a digital posterior restoration workflow, internal preparation design must accommodate the specific diameter of the milling unit's burs to prevent internal binding and micro-fractures.
Opposing Dentition: Material selection and thickness must account for the wear potential on opposing natural teeth, heavily influencing the choice between glass ceramics and monolithic zirconia.
Defining the biomechanical baseline for posterior restorations requires understanding how natural teeth manage occlusal forces. The intact tooth functions as a unified structure where the rigid enamel shell protects the resilient dentin core. When decay or trauma compromises this structure, the primary goal of any restoration is to mimic the natural flexural strength of the intact tooth while withstanding cyclic masticatory forces. A successful partial coverage restoration must restore structural rigidity without introducing new stress concentrations that could lead to catastrophic failure of either the material or the remaining tooth structure. Achieving this balance depends entirely on managing material thickness in relation to the underlying preparation geometry.
Large posterior defects demand materials with superior physical properties and structural rigidity. While direct composite resins perform admirably in small to medium-sized class I and class II preparations, they exhibit significant limitations when applied in bulk across wide isthmuses or missing cusps. Direct composites suffer from polymerization shrinkage stress. This shrinkage pulls the cusps inward, leading to cuspal deflection, microleakage, and post-operative sensitivity when placed in large volumes. Furthermore, composite resins undergo accelerated occlusal wear under heavy masticatory loads, particularly in patients with parafunctional habits.
A well-designed ceramic inlay onlay overcomes these limitations by offering exceptional compressive strength and wear resistance. Because the ceramic is fabricated outside the mouth, polymerization shrinkage is limited entirely to the ultra-thin layer of resin cement used for bonding. This structural rigidity prevents cuspal flexure under load. It effectively splints the remaining tooth structure together, providing long-term occlusal stability that direct composites simply cannot match in extensive posterior defects.
Occlusal loads transfer through the ceramic material, across the adhesive interface, and into the underlying dentin. The mechanics of this stress distribution dictate why specific thickness parameters are non-negotiable. When a patient bites down, the occlusal surface of the restoration experiences compressive stress, while the intaglio (internal) surface experiences tensile stress. Dental ceramics are inherently strong under compression but highly susceptible to fracture under tension.
The relationship between material thickness and the dissipation of tensile stress is direct and profound. Adequate thickness prevents the ceramic from flexing under occlusal loads. If the material is too thin, it bends slightly during mastication. This microscopic flexure concentrates tensile stress at the internal fitting surface. It initiates micro-cracks that propagate outward, eventually resulting in bulk fracture of the restoration. Maintaining the minimum required thickness ensures the material remains rigid, forcing the load to dissipate harmlessly through the adhesive layer and into the tooth.
The resin cement does much more than simply hold the restoration in place. It acts as a shock absorber between the rigid ceramic and the flexible dentin. A uniform, defect-free adhesive layer distributes functional stresses evenly across the entire preparation surface. This stress distribution mechanism explains why a well-bonded restoration to dentin and enamel can sometimes compensate for minor marginal thickness variations.
However, you must not rely on adhesion to rescue inadequate preparation depth. Poorly bonded restorations fail regardless of their thickness. If the adhesive bond degrades due to moisture contamination, inadequate isolation, or poor protocol execution, the ceramic loses its foundational support. Without the splinting effect of the underlying tooth, even a thick ceramic restoration will experience localized stress concentrations and fracture. Therefore, the synergy between adequate material thickness and flawless adhesive execution defines the ultimate success of the procedure.
To evaluate biomechanical risk before picking up a handpiece, follow these assessment steps:
Measure the isthmus width of the existing defect using a periodontal probe. If it exceeds half the intercuspal distance, plan for cusp coverage.
Evaluate the opposing dentition for wear facets, which indicate heavy occlusal loading or bruxism.
Assess the remaining enamel volume. If less than 50% of the preparation margin will reside in enamel, adjust your material choice to favor mechanical retention over pure adhesion.
Check interocclusal clearance in maximum intercuspation and excursive movements to ensure you have room for the required material thickness.
Lithium disilicate remains the gold standard for posterior partial coverage restorations due to its excellent optical properties and highly predictable adhesive capabilities. When preparing a tooth for a glass ceramic inlay, strict adherence to minimum thickness requirements is mandatory. The minimum occlusal thickness in stress-bearing areas must be between 1.5 mm and 2.0 mm. This depth ensures the material possesses enough bulk to resist flexural fatigue over time.
Beyond occlusal depth, the isthmus width requires careful management. The preparation must allow for a minimum isthmus width of 1.5 mm to prevent fracture at the restoration's narrowest point. Lithium disilicate exhibits a flexural strength of approximately 400 to 500 MPa. While this is robust, its clinical survival relies heavily on the adhesive bond. The material must be etched with hydrofluoric acid and treated with silane to create a chemical bond with the resin cement. This bonding process effectively increases the fracture resistance of the ceramic, integrating it with the tooth structure.
Monolithic zirconia presents a different set of biomechanical rules. With flexural strengths reaching up to 1200 MPa for high-strength variants (3Y-TZP), zirconia can survive at significantly reduced thicknesses compared to glass ceramics. Clinicians can often achieve predictable results with a zirconia inlay onlay using a minimum occlusal reduction of just 1.0 mm to 1.2 mm. This makes zirconia an attractive option for patients with limited interocclusal space or short clinical crowns.
However, this superior strength comes with a clinical trade-off regarding adhesion. Zirconia is a polycrystalline ceramic without a glassy matrix, meaning it cannot be etched with hydrofluoric acid. Instead, bonding relies on air-particle abrasion. You must sandblast the internal surface with 50-micron aluminum oxide at 2 bar pressure, followed by the application of MDP-containing primers. Because zirconia's bond strength to tooth structure is inherently lower than that of etchable glass ceramics, the preparation geometry must provide some degree of mechanical resistance and retention form to limit sheer stress on the adhesive interface. Preparations must be less divergent and more precise to compensate for the weaker chemical bond.
Material selection and thickness directly impact the wear potential on opposing natural teeth. The surface hardness of the chosen ceramic dictates how it interacts with the antagonist enamel during mastication and parafunction. Highly polished monolithic zirconia is incredibly smooth and causes minimal wear to opposing dentition, often performing better than natural enamel against enamel.
Problems arise when inadequate preparation thickness leads to material fracture or necessitates aggressive occlusal adjustment after cementation. Adjusting a ceramic restoration destroys the surface glaze or factory polish, exposing rough, unpolished ceramic crystals. Unpolished glass ceramics and zirconia act like sandpaper against opposing natural teeth, accelerating enamel wear rapidly. If you must adjust the occlusion, meticulous repolishing using dedicated diamond polishing systems is mandatory to protect the opposing dentition.
Recognizing when a ceramic restoration is not indicated prevents overtreatment and premature failure. Very small or shallow carious lesions do not justify the removal of healthy tooth structure required to meet the 1.5 mm thickness threshold for ceramics. In these scenarios, a direct composite resin remains the most conservative and appropriate treatment, preserving maximum enamel while effectively sealing the defect.
Extreme bruxism cases present another significant challenge. Patients with severe parafunctional habits exert forces that exceed the flexural limits of standard glass ceramics. In these situations, the risk of material fracture or severe opposing wear necessitates alternative restorative strategies. High-strength monolithic zirconia or cast gold restorations may be required, alongside the mandatory fabrication of a rigid occlusal guard to protect the restorations and the remaining dentition from uncontrolled nocturnal forces.
Ceramic Material Preparation Guidelines
Material Type | Minimum Occlusal Thickness | Minimum Isthmus Width | Flexural Strength | Primary Bonding Mechanism |
|---|---|---|---|---|
Lithium Disilicate | 1.5 mm - 2.0 mm | 1.5 mm | 400 - 500 MPa | HF Acid Etch + Silane |
Leucite-Reinforced Glass | 2.0 mm | 2.0 mm | 100 - 150 MPa | HF Acid Etch + Silane |
Monolithic Zirconia (3Y-TZP) | 1.0 mm - 1.2 mm | 1.0 mm | 900 - 1200 MPa | Air Abrasion + MDP Primer |
Zirconia-Reinforced Lithium Silicate | 1.5 mm | 1.5 mm | 370 - 420 MPa | HF Acid Etch + Silane |
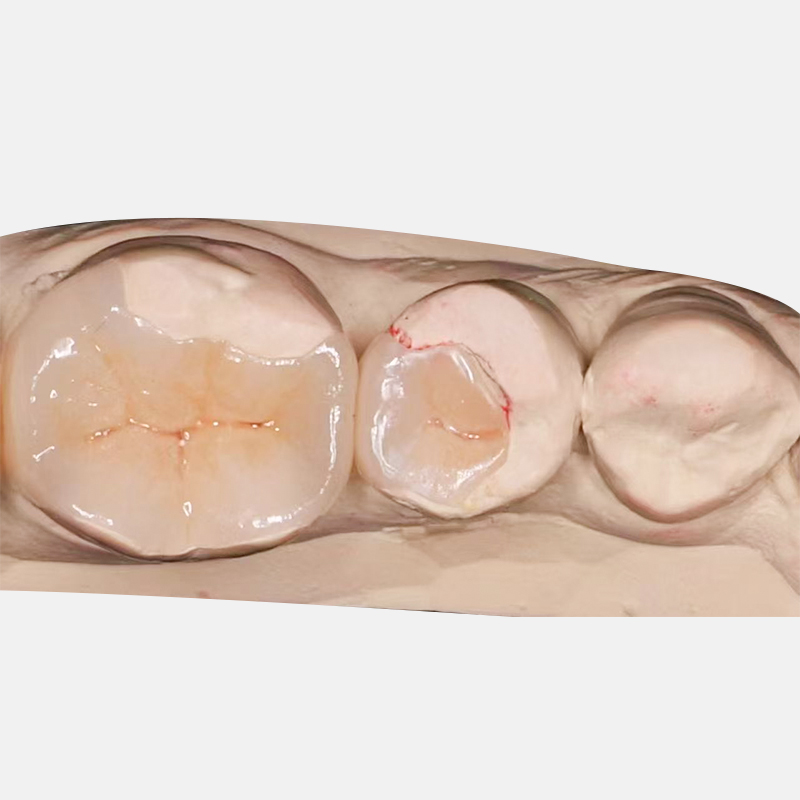
Translating material requirements into actionable preparation design requires defining the boundaries of partial coverage. An inlay is entirely intra-coronal, restoring occlusal and proximal defects without capping any cusps. When the defect extends outward and compromises the structural integrity of a cusp, the preparation transitions to an onlay, which caps one or more cusps to protect them from fracture. An overlay involves full occlusal coverage of all cusps while leaving the axial walls largely intact, preserving the cervical enamel band. Understanding these distinctions prevents the unnecessary transition to a traditional full crown, which aggressively removes healthy axial tissue and often destroys the enamel required for optimal adhesion.
The decision framework for transitioning from an intra-coronal preparation to cusp coverage relies on specific geometric thresholds. The general rule dictates that when the isthmus preparation exceeds one-half to two-thirds of the intercuspal distance, the remaining cusps are severely weakened and prone to fracture. At this point, you must reduce the compromised cusps to allow the ceramic material to cover and protect them.
Executing the ideal 1.5 mm reduction for functional cusps ensures longevity without over-preparing. You must follow the anatomical planes of the tooth, maintaining the natural cusp inclines rather than flattening the occlusal surface. This anatomical reduction provides uniform material thickness while preserving maximum dentin over the pulp chamber. Use a 1.5 mm depth-cutting diamond bur to sink guide grooves into the occlusal surface before bulk reduction. This eliminates guesswork and guarantees adequate clearance.
You must understand the principle that thicker is not always better. Excessive thickness requires deeper dentin exposure. Deep dentin contains wider dentinal tubules and higher water content, which inherently compromises the adhesive bond compared to shallow, enamel-rich preparations. Over-preparing a tooth to achieve 3.0 mm of ceramic thickness weakens the tooth structurally and degrades the bonding substrate, ultimately reducing the restoration's lifespan.
Adhesive dentistry allows for endlessly customizable shapes, liberating you from the traditional G.V. Black retentive boxes designed for amalgam. Modern ceramic preparations should flow smoothly, following the extent of the decay rather than forcing the tooth into a rigid geometric box. This biomimetic approach preserves healthy tissue and relies on the resin cement, rather than mechanical friction, for retention.
The necessity of rounded internal line angles cannot be overstated. Sharp internal corners act as stress concentrators. When occlusal forces are applied, these sharp angles initiate micro-fractures in the ceramic that rapidly propagate into catastrophic failures. All internal transitions must be smoothed with fine-grit diamonds or finishing burs. A tapered diamond with a rounded end (like an 845KR or 856 series) is ideal for this purpose.
Margin configurations must provide adequate bulk at the restorative interface. Heavy chamfer or modified shoulder preparations with rounded internal angles are ideal, providing a distinct finish line for scanning and sufficient material thickness at the margin. Feather-edge margins are strictly contraindicated for glass ceramics. The material will simply chip and fracture at the ultra-thin periphery during milling, seating, or function.
Subgingival proximal defects threaten both isolation and adhesive protocols. When a margin drops below the cementoenamel junction (CEJ) into dentin or cementum, achieving a dry field for bonding becomes exceptionally difficult. In these scenarios, Deep Margin Elevation (DME) protocols are essential.
To execute a predictable Deep Margin Elevation, follow these specific steps:
Achieve absolute isolation using a rubber dam. If the dam cannot invert past the margin, use a split-dam technique combined with Teflon tape packing.
Place a specialized matrix band (such as a Tofflemire or a highly curved sectional matrix) that seals tightly against the root surface below the defect.
Apply a dentin bonding agent according to the manufacturer's instructions, ensuring thorough solvent evaporation.
Inject a highly filled flowable composite or a heated restorative composite into the deepest portion of the box, building it up in 1.0 mm increments.
Light cure each increment thoroughly. The goal is to raise the margin 1.0 mm to 2.0 mm supragingivally.
Remove the matrix and refine the new composite margin with a fine diamond bur, ensuring a smooth transition between the composite and the tooth structure.
This technique relocates the restorative margin to an accessible area, ensuring predictable isolation during the final cementation of the ceramic. It also provides a smooth, easily scannable margin for the digital workflow, eliminating the inaccuracies associated with capturing deep subgingival anatomy.
The integration of CAD/CAM technology fundamentally dictates how you must approach preparation design. A digital posterior restoration workflow requires preparations that are optimized not just for the material, but for the optical scanner and the milling machine. What looks acceptable to the human eye may be impossible for a milling unit to reproduce accurately. You must adapt your tactile habits to the mathematical constraints of digital manufacturing.
The most significant constraint in digital dentistry is the diameter of the milling unit's burs. Internal preparation angles must be larger than the radius of the smallest milling bur, which typically ranges from 1.0 mm to 1.4 mm depending on the specific CAD/CAM system. If you prepare a sharp, narrow internal box that is smaller than the bur's radius, the milling machine faces a geometric impossibility.
The software will resolve this conflict in one of two ways. It may choose to over-mill, cutting away extra ceramic to ensure the restoration seats. This results in a large internal gap filled with weak resin cement, which acts as a weak link under occlusal load. Alternatively, the software may under-mill, leaving extra ceramic in the internal corner. This results in a restoration that binds on the sharp tooth structure and fails to seat entirely. Both outcomes compromise the clinical result. Utilizing tapered burs with rounded ends and ensuring all internal transitions are smooth and expansive guarantees passive seating and uniform cement layers.
The accuracy of the digital impression relies heavily on preparation smoothness and clear margin visibility. Intraoral scanners stitch together thousands of images to create a 3D model. Rough, jagged preparations scatter light and create digital noise, leading to inaccurate models and poorly fitting restorations. Furthermore, the scanner must have an uninterrupted line of sight to the entire finish line.
Tissue management using retraction cord or soft tissue lasers is mandatory to displace the gingiva and expose the margin clearly. Packing a size 00 or 000 cord into the sulcus physically pushes the tissue away from the finish line. A smooth preparation with a distinct, visible margin translates directly into a precise digital model and a perfectly fitting ceramic restoration.
Milling Bur Diameter vs. Internal Line Angle Requirements
Milling Unit Bur Size | Minimum Internal Radius Required | Recommended Preparation Bur | Risk of Sharp Angles |
|---|---|---|---|
1.0 mm Step Bur | 0.6 mm | Medium Round-End Taper (e.g., 856-016) | Under-milling (Restoration won't seat) |
1.2 mm Cylinder Bur | 0.7 mm | Large Round-End Taper (e.g., 856-018) | Over-milling (Large cement gap) |
1.4 mm Tapered Bur | 0.8 mm | Extra-Large Round-End Taper (e.g., 856-021) | Severe Over-milling / Thinning of ceramic |
The most common cause of ceramic fracture is under-reduction, often stemming from a fear of pulpal exposure. When working on severely worn or flat teeth, it is easy to lose spatial orientation and provide insufficient occlusal clearance. If the ceramic is milled too thin to compensate for the lack of space, it will inevitably fracture under load.
Mitigation requires objective measurement rather than visual estimation. You must utilize depth-cutting burs to establish precise 1.5 mm grooves across the occlusal surface before bulk reduction. Additionally, fabricating a silicone reduction matrix before preparing the tooth allows you to slice the matrix and visually verify the exact amount of clearance achieved before capturing the final impression or digital scan. Place the sliced matrix over the prepared tooth and measure the gap with a periodontal probe.
Conversely, over-preparing a tooth to guarantee material thickness results in preparations that reside entirely in dentin. While this ensures the ceramic is strong, it destroys the enamel periphery necessary for a highly predictable, long-term adhesive seal. Dentin bonding degrades over time due to enzymatic breakdown and moisture, whereas enamel bonding remains stable for decades.
When deep dentin exposure is unavoidable, you must implement Immediate Dentin Sealing (IDS) protocols. IDS involves applying a dentin bonding agent to the freshly cut dentin immediately after preparation, prior to taking the impression. To execute IDS properly:
Clean the freshly prepared dentin with pumice or a mild abrasive.
Apply a self-etch or total-etch adhesive system according to the manufacturer's guidelines.
Light cure the adhesive layer thoroughly.
Apply a very thin layer (0.5 mm) of flowable composite over the adhesive to protect it.
Light cure again, then remove the oxygen-inhibited layer with glycerin gel and a final light cure.
This protects the pulp from bacterial microleakage, prevents post-operative sensitivity, and significantly improves the ultimate bond strength by allowing the dentin adhesive to mature without competition from the shrinkage stress of the final resin cement.
Deep inlay preparations present a highly unfavorable cavity configuration factor (C-factor). When the resin cement polymerizes, it shrinks toward the center of its mass. In a deep, box-like preparation, this shrinkage stress pulls away from the cavity walls, potentially causing debonding at the adhesive interface, white lines at the margins, and severe post-operative sensitivity.
Mitigating this risk involves meticulous cementation protocols. Utilizing dual-cure resin cements allows for a slower, chemically initiated setting reaction that reduces overall shrinkage stress compared to purely light-cured systems. Furthermore, you should employ controlled light-curing protocols. Tack-cure the margins briefly (1-2 seconds) to remove excess cement, then allow the chemical cure to progress for several minutes before applying final, high-intensity light polymerization.
Audit your current preparation burs to ensure they align with the internal milling parameters of your preferred lab or chairside digital system, discarding sharp-ended instruments in favor of rounded, tapered diamonds.
Implement reduction matrices and depth-cutting burs as a standard operating procedure for every posterior preparation to eliminate the guesswork from occlusal reduction.
Adopt Immediate Dentin Sealing (IDS) protocols whenever preparation depth exposes significant dentin to maximize bond strength and eliminate post-operative sensitivity.
Transition to dual-cure resin cements for deep inlay preparations to manage polymerization shrinkage stress and prevent marginal debonding.
A: For glass ceramics like lithium disilicate, the minimum recommended occlusal thickness in stress-bearing areas is 1.5 mm. For high-strength monolithic zirconia, the thickness can occasionally be reduced to 1.0 mm, though 1.2 mm to 1.5 mm remains ideal for long-term predictability.
A: While direct composites are excellent for small restorations, they suffer from polymerization shrinkage and wear in large defects. Ceramics offer superior structural rigidity, prevent cuspal flexure, and provide exceptional long-term wear resistance for extensive posterior restorations.
A: No. Feather-edge margins are strictly contraindicated for glass ceramics. The ultra-thin periphery will chip and fracture during the milling process or under functional occlusal loads. A heavy chamfer or modified shoulder is required.
A: Sharp internal angles act as stress concentrators, leading to ceramic fracture. In a digital workflow, milling burs cannot reach into sharp corners, causing the software to either over-mill, creating weak cement gaps, or under-mill, preventing the restoration from seating.
A: Implement Deep Margin Elevation (DME). Use a specialized matrix band and flowable composite to raise the deep subgingival margin to a supragingival level before taking the final impression, ensuring proper isolation for final cementation.
A: IDS is the application of a dentin bonding agent to freshly cut dentin immediately after preparation and before taking the impression. It protects the pulp, prevents sensitivity, and significantly increases the final bond strength of the restoration.


