


Views: 0 Author: Site Editor Publish Time: 2026-08-06 Origin: Site


The long-term viability of a multi-unit implant restoration is dictated as much by the soft tissue interface as it is by osseointegration. Improperly designed pontic contours lead to plaque retention, gingival hyperplasia, phonetic complications, and aesthetic failures. Clinicians and dental technicians must balance cleansability with natural emergence profiles, especially in deficient ridges. Evaluating the structural, biological, and aesthetic trade-offs of different pontic designs is critical for prescribing a functional, complication-free restoration. This guide examines the decision frameworks for pontic architecture, tissue management, and abutment selection. Proper execution requires a deep understanding of the restorative space and the biological width surrounding the implant platform. We will look at specific clinical protocols for soft tissue sculpting, material selection criteria, and how to avoid common structural failures in multi-unit frameworks to ensure predictable, long-lasting patient outcomes.
Biologic Width and Tissue Health: The intaglio surface of the pontic must apply appropriate, non-ischemic pressure to maintain papilla architecture without causing tissue necrosis.
Design by Arch Position: Ovate and modified ovate pontics remain the standard for the aesthetic zone, while modified ridge lap or hygienic designs are prioritized for posterior cleansability.
Abutment Influence: The choice between a multi unit abutment bridge and a custom abutment bridge fundamentally alters the available restorative space and framework design.
Material Biocompatibility: Highly polished, unglazed zirconia or specialized ceramics are mandatory for the tissue-contacting surfaces to minimize biofilm accumulation.
Defining the triad of pontic success requires a strict focus on biological compatibility, biomechanical stability, and aesthetic or phonetic function. The pontic must replace missing dentition without compromising the health of the underlying ridge or the adjacent implants. Biological requirements demand that the pontic shape prevents food impaction while allowing adequate access for interproximal brushes or water flossers. If the tissue-facing surface creates a plaque trap, peri-implant mucositis can rapidly develop, threatening the entire restoration.
Phonetic considerations are equally demanding, particularly in maxillary anterior restorations. The pontic must seal the space against the ridge to prevent air escape during speech. A failure to manage this contour often results in a whistling sound when the patient forms specific consonants. Achieving this seal requires precise tissue contact without applying excessive pressure that could blanch and necrose the gingiva. The clinical team must evaluate the ridge topography and design a pontic that intimately adapts to the soft tissue while maintaining a passive, non-compressive fit during function.
Load distribution across the framework dictates the minimum connector cross-sections. The pontic span directly affects the flexural strength of the restoration. Structural variations ranging from a single pontic to multi-pontic configurations introduce distinct biomechanical challenges. For instance, a 4-unit implant supported dental bridge containing two adjacent pontics increases the deflection risk under occlusal loading. These extended spans require larger connector dimensions and highly engineered gingival embrasures to prevent tissue strangulation while maintaining structural integrity. The laboratory must calculate the required material thickness based on the anticipated bite force and the specific properties of the chosen restorative material.
To ensure long-term success, clinicians must adhere to several core principles when evaluating pontic design:
Assess the vertical and horizontal restorative space to determine the maximum allowable pontic dimensions.
Evaluate the patient's soft tissue biotype to predict how the gingiva will respond to pontic pressure.
Determine the required connector cross-section based on the span length and the restorative material.
Design the gingival embrasures to facilitate easy access for interdental cleaning aids.
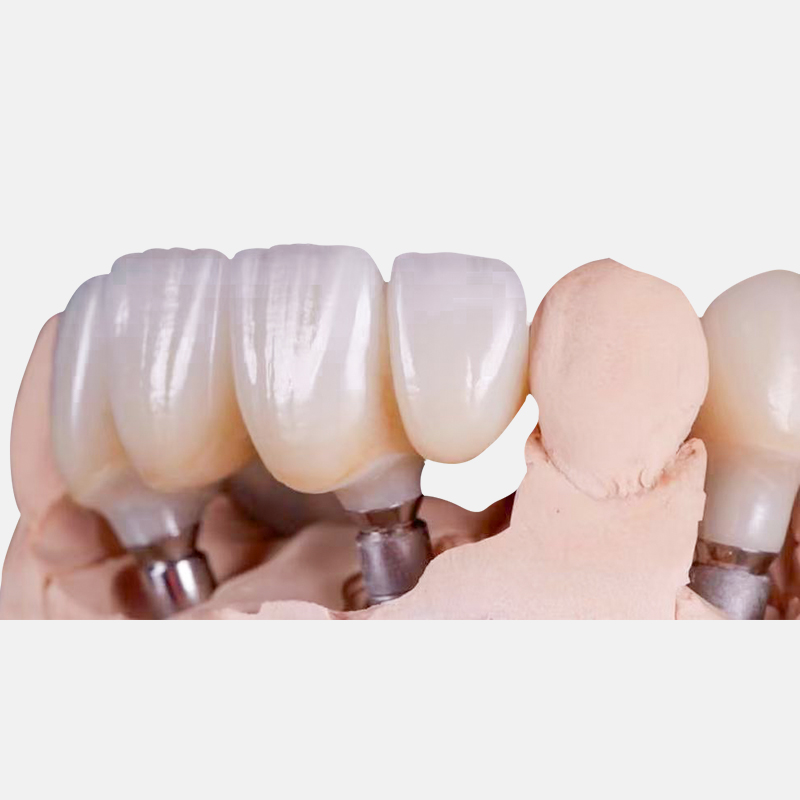
Standard geometries used in implant prosthodontics dictate how the restoration interacts with the soft tissue. Selecting the correct classification depends on the arch position, the volume of available tissue, and the patient's hygiene capabilities. A mismatch between the pontic design and the anatomical site often leads to chronic inflammation or aesthetic failure.
The ovate pontic features a convex, egg-shaped design that sits within a surgically or prosthetically created soft tissue depression. This cosmetic-first design provides the most natural emergence profile and optimal phonetics. It creates the illusion that the tooth is emerging directly from the gingiva, making it the standard for the maxillary anterior aesthetic zone. The tissue must be carefully sculpted to receive the pontic, requiring precise provisionalization and adequate healing time.
The modified ovate pontic reduces the depth of the tissue depression. It is easier to clean while maintaining excellent anterior aesthetics. By flattening the most apical portion of the convexity, the modified ovate design reduces the risk of tissue hypertrophy while still supporting the interdental papillae. This modification is particularly useful in areas where the ridge volume is slightly deficient, allowing for a highly aesthetic result without the need for extensive soft tissue grafting.
This design is convex on the facial aspect to mimic natural tooth emergence, but cut away on the lingual aspect. The lingual surface is either concave or flat, balancing facial aesthetics with lingual hygiene access. The modified ridge lap is highly effective in the premolar and molar regions where aesthetic demands are lower but cleansability is paramount.
There is a significant implementation risk with this geometry. If the facial lap is too concave, it creates a plaque trap that is completely inaccessible to patient hygiene. The tissue-contacting area must remain convex or flat to allow floss to sweep the surface effectively. Dental technicians must carefully contour the intaglio surface to ensure a smooth transition from the facial aspect to the lingual clearance area.
Hygienic pontics remain completely clear of the underlying soft tissue, typically maintaining 2 to 3 millimeters of clearance. This design offers maximum cleansability and zero tissue irritation. However, it is aesthetically poor and can cause significant phonetic issues due to the large space between the pontic and the ridge. Food can also become temporarily trapped in the space, requiring the patient to actively flush the area after meals.
This design is best utilized for posterior mandibular restorations where aesthetics are not a primary concern. It is also applicable in specific configurations of a full arch implant bridge where the transition line is hidden below the patient's smile line, prioritizing long-term hygiene over gingival mimicry. When utilizing a hygienic design, the framework must be robust enough to withstand occlusal forces without the additional support provided by tissue contact.
Comparison of Pontic Contour Classifications | ||||
Pontic Design | Aesthetic Quality | Cleansability | Primary Indication | Tissue Contact |
|---|---|---|---|---|
Ovate | Excellent | Moderate | Maxillary Anterior | Convex, sits in tissue depression |
Modified Ovate | Very Good | Good | Anterior / Premolar | Slightly flattened convexity |
Modified Ridge Lap | Good (Facial) | Very Good | Posterior (Maxillary/Mandibular) | Convex facial, open lingual |
Hygienic | Poor | Excellent | Posterior Mandibular | None (2-3mm clearance) |
The foundation dictates the pontic design. The choice of abutment directly influences the vertical restorative space, the emergence profile, and the framework's interaction with the soft tissue. Clinicians must select the appropriate abutment system based on the implant angulation, the depth of the implant platform, and the aesthetic requirements of the case.
Multi-unit abutments raise the restorative platform above the tissue level. This shift requires specific vertical clearance calculations for the pontic framework. A multi unit abutment bridge is excellent for achieving passive fit across divergent implants. By standardizing the restorative platform, clinicians can seat complex frameworks without inducing stress on the implant bodies. This is particularly critical in full-arch restorations where multiple implants are placed at varying angles to maximize bone engagement.
However, this system can limit the vertical space available for ideal pontic emergence profiles if the implants are placed too shallow. The raised platform means the transition from the abutment to the pontic must occur rapidly, which can complicate the creation of a natural-looking ovate receptor site in the aesthetic zone. Clinicians must carefully plan the implant depth to ensure adequate running room for the restorative materials when utilizing multi-unit abutments.
Patient-specific custom abutments dictate soft tissue healing and support the interdental papillae adjacent to the pontic site. A custom abutment bridge provides superior control over the transition from the implant platform to the pontic contour. The abutment margins can be placed precisely at or slightly below the gingival crest, allowing for a seamless aesthetic transition. This level of customization is essential for managing complex soft tissue architectures and achieving optimal pink aesthetics.
This approach involves higher upfront laboratory complexity. The technician must design the abutments and the pontic framework simultaneously to ensure adequate material thickness and ideal tissue support. Despite the complexity, custom abutments remain the premier choice for highly demanding aesthetic cases. They allow the clinician to dictate the exact emergence profile, ensuring the pontic blends naturally with the adjacent dentition and the surrounding soft tissue.
Pontic design cannot succeed without proper soft tissue architecture. The biological foundation must be prepared to receive the restoration, ensuring the tissue remains healthy and stable under the pontic. Effective tissue management requires a combination of surgical precision and prosthetic manipulation.
Using a temporary acrylic or PMMA bridge allows the clinician to gradually apply pressure to shape the ovate receptor site. This dynamic compression, achieved via the addition or subtraction of composite material to the provisional pontic, molds the gingiva over time. The provisional restoration acts as a template, guiding the soft tissue healing process and establishing the final emergence profile.
The surgical site preparation protocol often involves utilizing a round diamond bur to mechanically shape the tissue receptor site under local anesthesia. The clinician marks the desired zenith and margins on the provisional, performs the necessary tissue reduction, and utilizes hemostatic agents like ViscoStat for immediate bleeding control prior to seating the provisional. The required healing and sculpting phases typically take several weeks to months before the final impression is taken. During this time, the clinician monitors the tissue response and makes minor adjustments to the provisional pontic to optimize the contour.
The standard protocol for soft tissue sculpting includes the following steps:
Administer local anesthesia and evaluate the tissue thickness using a periodontal probe.
Utilize a coarse round diamond bur to create a concave receptor site in the edentulous ridge.
Apply a hemostatic agent to control bleeding and ensure a dry field.
Relieve the intaglio surface of the provisional pontic and add flowable composite to create a convex contour.
Seat the provisional restoration, ensuring light, non-blanching pressure on the newly prepared receptor site.
Evaluate the tissue response after two weeks and modify the provisional contour as needed.
Structuring the sculpting process to align with the bone healing phase is critical. Implants generally require 3 to 6 months to fully integrate with the jawbone. Subjecting the surrounding soft tissue and bone to active dynamic forces from progressive provisional pontic pressure too early can disrupt osseointegration. The clinical team must balance the desire for rapid aesthetic results with the biological requirements of bone healing.
Clinicians must verify implant stability before initiating aggressive soft tissue sculpting. Once integration is confirmed, the provisional restoration can be modified to apply the necessary pressure to form the papillae and the pontic receptor site. In cases of immediate loading, the provisional pontic should be designed with minimal tissue contact to avoid transmitting excessive forces to the integrating implants.
Evaluating a deficient ridge dictates whether surgical or prosthetic solutions are required. Hard and soft tissue grafting can rebuild the ridge to allow for a standard ovate pontic. This surgical approach provides the most natural outcome but requires additional healing time and patient compliance. Grafting procedures must be carefully planned to ensure adequate blood supply and primary closure over the augmented site.
When surgical augmentation is unpredictable or declined by the patient, gingival ceramics offer a viable alternative. Using pink porcelain to simulate tissue alters the pontic-to-ridge contact area. This approach is frequently used to manage severe vertical defects, masking the tissue loss while maintaining cleansable intaglio surfaces. The dental technician must carefully match the shade and texture of the pink ceramic to the patient's natural gingiva to achieve a seamless integration.
The interaction between material science and tissue health directly influences the longevity of the restoration. The pontic material must resist plaque accumulation while providing adequate structural strength. Selecting the appropriate material requires a thorough understanding of the biomechanical demands of the specific restorative site.
Monolithic or layered zirconia offers superior soft-tissue response and low plaque affinity. The biocompatibility of zirconia allows the gingiva to adapt closely to the pontic without chronic inflammation. Zirconia frameworks provide exceptional flexural strength, making them ideal for long-span restorations. Metal-ceramic restorations possess historical reliability but carry the potential for tissue discoloration or porcelain chipping at the pontic margins. High-performance polymers are occasionally used for long-term provisionals but lack the wear resistance and tissue compatibility of zirconia for definitive restorations.
The tissue-facing side of the pontic must be highly polished, not glazed. Glaze can degrade over time in the oral environment, increasing surface roughness and leading to peri-implant mucositis. A mechanically polished zirconia surface provides the smoothest possible interface, minimizing biofilm accumulation and facilitating easy maintenance for the patient. The laboratory must utilize specialized polishing pastes and wheels to achieve a mirror-like finish on all tissue-contacting surfaces.
Anticipating implementation risks allows clinicians to design restorations that withstand the harsh oral environment. Tissue hypertrophy is often caused by excessive pressure from an oversized ovate pontic. This is mitigated by careful provisional staging, allowing the tissue to adapt gradually rather than forcing the final shape immediately. The clinician must monitor the tissue response during the provisional phase and adjust the pontic contour if signs of inflammation or hypertrophy appear.
Food impaction frequently results from open embrasures or improper modified ridge lap angles. Precise laboratory communication regarding embrasure closure and intaglio convexity is required to prevent this issue. Framework fracture is caused by inadequate material thickness at the pontic connectors. Adhering to strict minimum cross-sectional guidelines based on the chosen material ensures the implant supported bridge can withstand occlusal forces without catastrophic failure. The laboratory must utilize CAD software to verify the connector dimensions before milling the final framework.
Evaluate the available restorative space and tissue volume before selecting a pontic classification.
Utilize provisional restorations to sculpt the soft tissue and verify phonetic function prior to final fabrication.
Specify highly polished, unglazed intaglio surfaces for all definitive zirconia or ceramic pontics.
Consult with your dental laboratory to establish standard operating procedures for pontic emergence profiles.
A: For hygienic pontics, a clearance of 2 to 3 millimeters is ideal to allow for easy cleaning. For ovate or modified ridge lap pontics, the restoration should maintain light, non-blanching contact with the tissue to prevent food impaction while supporting the gingival architecture.
A: While possible, it is rarely recommended. The posterior mandible often lacks the tissue depth required for an ovate receptor site. Modified ridge lap or hygienic designs are preferred in this region to prioritize cleansability over aesthetics.
A: Patients should use super floss, interdental brushes, or water flossers. The lingual aspect of the pontic is designed to be open or flat, allowing these hygiene aids to sweep the convex facial tissue-contacting surface effectively.
A: Glaze can wear away over time, leaving a rough surface that attracts plaque and bacteria. A highly polished surface, particularly with zirconia, remains smooth indefinitely, promoting better soft tissue health and reducing the risk of mucositis.
A: Tissue sculpting using a provisional restoration typically takes 4 to 8 weeks. The process involves gradual modifications to the provisional pontic to apply light pressure, allowing the gingiva to adapt and form a stable, natural-looking receptor site.


