


Views: 0 Author: Site Editor Publish Time: 2026-08-23 Origin: Site


Restoring an implant presents a strict biomechanical challenge. You lack the forgiving nature of a periodontal ligament (PDL). Natural teeth intrude 25 to 100 μm under heavy load. Osseointegrated implants move only 3 to 5 μm. This discrepancy requires precise, mathematically verified occlusal clearance. Without it, the implant bears the brunt of initial occlusal forces. Premature contacts drive mechanical complications, specifically porcelain fracture, screw loosening, and implant failure.
Determining the correct occlusal clearance depends on a matrix of variables. You must evaluate retention type, restorative material, abutment design, and opposing dentition. Screw-retained and cement-retained restorations demand different vertical minimums. This guide provides evidence-based parameters for evaluating and executing implant restorations. We outline the exact spatial requirements needed to prevent costly laboratory halts and clinical failures.
Minimum Restorative Space: A minimum of 6 to 7 mm of interarch space is generally required from the implant platform to the opposing dentition to ensure adequate material thickness, abutment height, and hygiene access.
The 30–50 μm Rule: Initial occlusal clearance on the master cast or digital design should target 30–50 μm. Clinically, shimstock should barely slide between the restoration and opposing arch under light biting force, only holding under maximum intercuspation.
Timing of Initial Contact: Occlusal schemes must account for vertical movement differences; implants must not sustain greater initial loads than adjacent natural teeth.
Retention Dictates Space: Screw-retained restorations typically require specific vertical minimums (e.g., 1 mm for the titanium base margin, plus material thickness), while cement-retained restorations require adequate abutment height (minimum 4 mm) for retention and resistance form.
Digital Verification: Utilizing physical clearance tools clinically and virtual articulation in CAD/CAM workflows prevents the most common cause of halted laboratory production.
Understanding the physiological differences between natural dentition and osseointegrated implants defines the success criteria for any restoration. Natural teeth exist within a dynamic suspension system. Implants remain rigidly fixed to the surrounding alveolar bone. This fundamental difference dictates every aspect of restorative design. Treating an implant like a natural tooth invites mechanical failure.
The periodontal ligament acts as a natural shock absorber. When a patient bites down, natural teeth intrude into the socket. This intrusion measures between 25 and 100 μm depending on the root surface area, bone density, and load direction. The PDL allows teeth to adapt to premature contacts safely. It also allows teeth to orthodontically shift out of traumatic occlusion over time. This adaptive capacity protects the underlying bone and the tooth structure from sudden impact forces.
Implants lack this protective mechanism entirely. Osseointegration provides a direct structural connection between living bone and the titanium surface. Under heavy load, an implant moves a mere 3 to 5 μm. This movement comes solely from the elastic deformation of the surrounding bone, not from any ligamentous suspension. Implants cannot absorb shock. They cannot adapt to premature contacts. They will not migrate away from traumatic forces. Any occlusal discrepancy transfers directly to the restorative components and the crestal bone.
The PDL contains highly sensitive mechanoreceptors. These receptors provide immediate feedback regarding bite force and occlusal interferences. Natural teeth possess exquisite tactile sensitivity. Patients can detect particles as small as 10 to 20 μm between their natural teeth. This feedback loop prevents patients from biting too hard and damaging their dentition. When a natural tooth hits a hard object, the jaw muscles reflexively release.
Implants suffer from severe proprioception deficits. Patients rely on distant mechanoreceptors in the bone and masticatory muscles. Tactile sensitivity decreases dramatically. Patients routinely bite four to eight times harder on implant restorations before registering the force. They simply do not feel the overload occurring. This deficit necessitates built-in occlusal safeguards. You must design delayed contact timing into the crown to protect the system from excessive, undetected bite forces.
Clinical indicators of biomechanical overload include:
Unexplained loosening of the abutment screw within the first six months of delivery.
Micro-fractures or chipping of the veneering porcelain on the occlusal table.
Widening of the PDL space on adjacent natural teeth due to altered chewing patterns.
Localized crestal bone loss around the implant collar without signs of plaque-induced inflammation.
Patient reports of a "heavy" feeling on the implant, even if articulating paper shows normal marks.
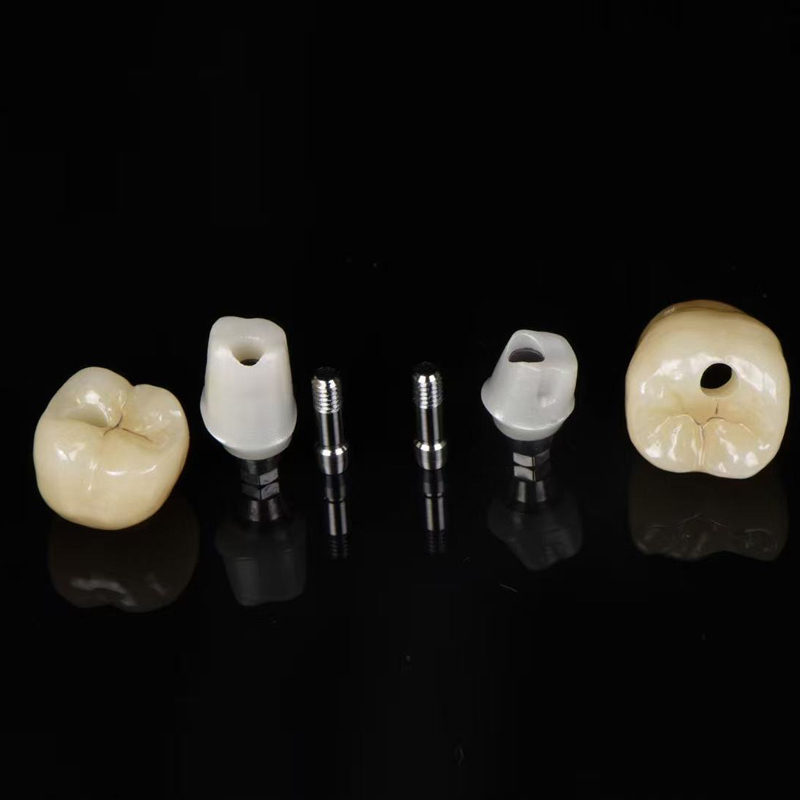
Proper vertical space prevents material failure. It also maintains biological width and ensures a cleansable emergence profile. We evaluate restorative space from the implant platform to the opposing dentition. Insufficient space forces compromises. You either thin out the restorative material or impinge on the soft tissue.
Vertical space requirements dictate the type of restoration you can deliver. You must allocate space for the abutment, the restorative material, and the necessary clearance. Biological width requires approximately 3 mm of soft tissue height above the bone crest. The emergence profile needs adequate running room to transition from the circular implant platform to the anatomical crown shape. Crowding this space creates hygiene traps and chronic inflammation.
Screw-retained restorations offer distinct advantages when interocclusal space is limited. They eliminate the need for cement space and abutment core height. A minimum of 6 mm of restorative space is generally required. This spatial allocation breaks down into specific components that must be mathematically verified before taking the final impression.
First, you need 1 mm from the implant platform to the restorative margin to accommodate the soft tissue collar. Next, consider the height of the titanium base chimney. When designing an implant crown on titanium base, the chimney typically requires 3 to 4 mm of height for adequate bonding surface area. Finally, you must add the minimum occlusal thickness of the restorative material above the chimney. Screw-retained options remain the preferred choice in space-compromised posterior regions. They maximize material thickness while minimizing the total vertical requirement.
Cement-retained restorations require more vertical space. You must rely on the physical geometry of the abutment for retention and resistance form. A minimum abutment height of 4 mm is mandatory. Anything shorter drastically increases the risk of decementation under lateral loads. The total vertical requirement generally reaches 7 mm.
This 7 mm rule accommodates several layers. You need space for the soft tissue collar. You need the 4 mm abutment height. You must account for 1 to 2 mm of cement space and crown thickness over the abutment. Compressing these requirements compromises the restoration. Shortening the abutment leads to crowns falling off. Thinning the occlusal material leads to fracture. Impinging on the tissue compromises hygiene access.
Different restorative materials demand different minimum occlusal reductions. You must match the material to the available space. Monolithic zirconia offers the highest strength in thin sections. High-translucency zirconia requires careful handling, but standard monolithic zirconia can often survive at 1.0 to 1.5 mm of occlusal thickness. This makes it ideal for posterior implant restorations where space is tight.
Lithium disilicate and porcelain-fused-to-metal (PFM) restorations require more space. To prevent fracture, these materials need 1.5 to 2.0 mm of occlusal clearance. PFM crowns require space for the metal coping, the opaque layer, and the veneering porcelain. Lithium disilicate relies on bulk for its strength. Using these materials in space-compromised areas significantly increases the risk of material failure.
Restorative Material Thickness Guidelines
Restoration Type | Minimum Total Space Required | Abutment / Base Height | Material Thickness Requirement | Primary Indication |
|---|---|---|---|---|
Screw-Retained (Monolithic Zirconia) | 5.0 - 6.0 mm | 3.0 - 4.0 mm (Ti-Base) | 1.0 - 1.5 mm | Limited posterior space |
Screw-Retained (Lithium Disilicate) | 6.0 - 7.0 mm | 3.0 - 4.0 mm (Ti-Base) | 1.5 - 2.0 mm | Anterior aesthetics |
Cement-Retained (Monolithic Zirconia) | 6.5 - 7.0 mm | 4.0 mm (Minimum) | 1.0 - 1.5 mm | Ideal vertical space |
Cement-Retained (PFM) | 7.0 - 8.0 mm | 4.0 mm (Minimum) | 1.5 - 2.0 mm | Traditional workflows |
Clinical protocols for adjusting and verifying occlusion require meticulous attention to detail. You cannot simply check the bite with articulating paper and assume it is correct. You must evaluate both static and dynamic occlusion. The goal is to protect the implant from overload while maintaining chewing efficiency.
Articulating paper marks contact points, but it does not measure clearance accurately. You must use shimstock foil. Instruct your team to use 8 μm or 12 μm shimstock for precise verification. The protocol requires testing the clearance under different bite forces to account for the intrusion of adjacent natural teeth.
Execute the following clinical sequence during delivery:
Seat the implant crown and torque the abutment screw to the manufacturer's specifications.
Place the 12 μm shimstock foil over the implant restoration and ask the patient to bite down lightly.
Pull the foil. It must pull through with slight drag. It should not tear, and it should not slip through without resistance.
Ask the patient to bite down firmly into maximum intercuspation. Under heavy contraction, the adjacent natural teeth intrude.
Pull the foil again. The shimstock should now hold firmly between the implant restoration and the opposing arch.
Verify excursive movements using 200 μm articulating paper to ensure no lateral interferences exist on the implant crown.
Laboratory master casts should be designed with a 30 to 50 μm clearance. This built-in offset accounts for clinical realities. It compensates for the compression of adjacent PDLs. It ensures the restoration arrives from the lab requiring minimal occlusal adjustment during delivery.
Clearance protocols change based on the opposing dentition. You must evaluate what the implant crown opposes. If it opposes a natural tooth, the 30 to 50 μm rule applies perfectly. The natural tooth will intrude under load. If the implant opposes another implant, neither will intrude. You must design lighter, broader contacts to distribute the force evenly without relying on intrusion.
If the implant opposes a tissue-borne prosthesis, such as a complete denture, the dynamics shift again. The denture will move significantly under load. You must design the occlusion to stabilize the denture without placing lateral forces on the implant. Bilateral balanced occlusion often applies in these scenarios to prevent tipping of the removable prosthesis.
Timing of initial occlusal contact remains a primary focus. Adjacent natural teeth must engage first. They absorb the initial load and trigger proprioceptive feedback. The implant crown makes contact milliseconds later. Furthermore, you must protect posterior implant restorations from lateral excursive forces. Mutually protected occlusion and anterior guidance achieve this. The anterior teeth should disclude the posterior implants during lateral and protrusive movements.
Clinical reality often presents cases where the ideal 6 to 7 mm of clearance is simply not available. You must navigate these space-compromised areas carefully. Selecting the right abutment becomes the most critical decision. Trade-offs exist between upfront laboratory costs, aesthetic outcomes, and long-term mechanical stability.
Custom abutments provide unparalleled control over restorative contours. An implant crown with custom abutment allows for optimal margin placement. You can place the margin exactly at or slightly below the gingival crest. This makes cement clean-up predictable and safe. Retained cement remains a leading cause of peri-implantitis. Custom margins eliminate this risk entirely by keeping the cement line visible and accessible.
Custom abutments also correct severe implant angulation. If an implant is placed off-axis, a custom abutment redirects the restorative platform. This ensures the occlusal forces direct down the long axis of the implant body. While a custom implant crown carries a higher upfront cost, it provides immense long-term value. It prevents peri-implantitis, reduces mechanical failure, and creates ideal emergence profiles in space-compromised areas.
Stock abutments fail completely when interocclusal space drops below 5 mm. You cannot modify a prefabricated abutment enough to create space without destroying its retention form. If you prep a stock abutment down to 2 or 3 mm, the cement-retained crown will inevitably fall off. The taper becomes too aggressive, and the surface area vanishes.
When space is severely restricted, you must transition to advanced solutions. A custom-milled abutment with specific retention grooves helps, but often it is not enough. You must pivot to a direct-to-fixture screw-retained crown. Utilizing an angulated screw channel (ASC) allows you to move the access hole away from the incisal edge or cusp tip. Castable UCLA abutments or direct-milled titanium bases provide the ultimate space-saving solution. They eliminate the abutment core entirely, maximizing the space available for restorative material.
Abutment Selection Based on Vertical Space
Available Vertical Space | Recommended Abutment Type | Retention Method | Risk Factor |
|---|---|---|---|
> 7.0 mm | Stock or Custom Abutment | Cement-Retained | Deep margins causing retained cement |
5.0 - 7.0 mm | Custom Abutment or Ti-Base | Screw or Cement-Retained | Inadequate material thickness if prepped poorly |
4.0 - 5.0 mm | Ti-Base or ASC | Screw-Retained Only | Loss of retention if cement is attempted |
< 4.0 mm | Direct-to-Fixture (UCLA) | Screw-Retained Only | High risk of material fracture under load |
Modern dental laboratories and clinics rely on digital workflows to standardize clearance verification. Scalability and compliance drive this shift. Guesswork leads to remakes. Digital precision reduces remake rates and prevents halted production. Standardizing these protocols ensures consistent, predictable outcomes across all implant cases.
CAD/CAM software changes how we manage occlusal space. When designing a digital implant crown, the technician sets exact spacer parameters. The software enforces minimum thickness alerts. If the design drops below 1.5 mm for lithium disilicate, the system flags the error immediately. This prevents weak restorations from ever reaching the milling machine.
Technicians program precise 30 to 50 μm occlusal offsets directly into the design software. Virtual articulators play a massive role here. They simulate dynamic jaw movements based on patient-specific data or average values. The software clears working and non-working interferences before milling begins. This digital articulation ensures the crown functions harmoniously within the patient's specific occlusal envelope, drastically reducing chairside adjustment time.
Digital design relies on accurate clinical data. If the initial preparation or space evaluation is flawed, the digital workflow cannot save the case. You must use physical occlusal clearance tabs clinically. Color-coded 1.5 mm and 2.0 mm flexible guides provide immediate visual confirmation of available space. Prep gauges ensure you have reduced enough tooth structure or selected the correct abutment height.
Verify this clearance during the impression or intraoral scanning phase. Providing the lab with verified clearance data prevents halted cases. Accurate bite registrations are equally critical. A distorted bite registration forces the lab to guess the vertical dimension. Capture the bite precisely, verify the clearance physically, and let the digital workflow execute the design.
Ignoring strict clearance parameters guarantees failure. The clinical and financial fallout of inadequate space is severe. You cannot cheat biomechanics. When materials lack sufficient thickness or implants bear premature loads, the system breaks down. We categorize these failures into mechanical and biological risks.
Premature occlusal contacts concentrate massive forces on small areas. This leads directly to porcelain chipping. Veneering porcelain cannot withstand point loading without underlying support. Zirconia framework fracture occurs when the material thickness drops below the minimum threshold. Even monolithic zirconia will snap if thinned out to accommodate a tight bite.
Abutment screw loosening is another direct consequence of inadequate clearance and premature contacts. When an implant crown hits early, it creates a bending moment on the implant assembly. This lateral force stretches the abutment screw. The preload is lost, and the screw loosens. Chronic screw loosening almost always points to an occlusal discrepancy or insufficient restorative space.
Mechanical overload eventually translates into biological failure. Occlusal overload is heavily linked to crestal bone loss. When the bone experiences stress beyond its physiological limit, it resorbs. This creates a funnel-shaped defect around the implant platform. Bone loss exposes the rough implant threads, leading to rapid plaque accumulation.
Inadequate vertical space also forces poor emergence profiles. If you lack the running room to transition from the implant to the crown smoothly, you create over-contoured restorations. These bulky crowns act as massive hygiene traps. The patient cannot clean beneath them. Plaque stagnates, tissue inflames, and peri-implantitis sets in. Proper occlusal clearance maintains the biological health of the implant.
Managing occlusal clearance dictates the survival of your implant restorations. Implement strict measurement protocols during the planning phase to avoid downstream complications. Execute the following steps to standardize your workflow:
Incorporate 8 μm or 12 μm shimstock into every implant delivery protocol to verify delayed contact timing.
Mandate a minimum of 6 mm interarch space for screw-retained and 7 mm for cement-retained restorations during initial treatment planning.
Utilize physical clearance tabs and prep gauges before capturing the final intraoral scan or impression.
Specify a 30 to 50 μm occlusal offset on all laboratory prescriptions for posterior implant crowns.
Transition immediately to custom-milled abutments or angulated screw channels when available vertical space drops below 5 mm.
A: Implants lack a periodontal ligament (PDL). Natural teeth intrude 25–100 μm under load, absorbing shock. Implants only move 3–5 μm. Providing 30–50 μm of clearance ensures the implant does not bear premature, heavy initial forces during mastication.
A: A minimum of 6 mm is generally required. This allows 1 mm from the platform to the margin, 3–4 mm for the titanium base chimney, and 1–1.5 mm for the occlusal restorative material to prevent fracture.
A: Use 8 μm or 12 μm shimstock foil. Under a light bite, the foil should pull through with slight drag. Under maximum intercuspation, the adjacent teeth intrude, and the foil should hold firmly between the implant and opposing tooth.
A: No. Prepping a stock abutment down to fit within 4 mm destroys its retention and resistance form. The crown will likely decement. You must use a custom-milled abutment or a direct-to-fixture screw-retained solution.
A: Material failure is imminent. Thin porcelain chips easily, and even monolithic zirconia will fracture under occlusal load if reduced below 1.0 mm. It also increases the risk of abutment screw loosening due to flexure.
A: CAD/CAM software allows technicians to set exact minimum thickness parameters and precise 30–50 μm occlusal offsets. Virtual articulators simulate jaw movements to eliminate interferences before the crown is ever milled, reducing clinical adjustment time.


